We have another great post and recipe for Gluten Free Strawberry Chocolate Cake with Swiss Buttercream from Kira McMullan. Kira is a professionally trained pastry chef, has her own blog Kira in the Kitchen where she shares 100% gluten free and delicious recipes.
When it comes to Gluten-Free baking it can be challenging to create pastries and breads that deliver on both taste and texture. This is because the science behind gluten free baking is different in terms of the methods and ingredients we are all accustomed to using in traditional baking. For example, these differences can result in a cake that is light and moist, or so heavy and dry that you feel like you’re swallowing sawdust.
8 Gluten Free Baking Secrets
So, whether you are new to gluten free baking or just looking to improve your skills, here are my top 8 Gluten Free Baking Secrets that will help you achieve the best gluten free pastries and desserts every time.
1. Follow a Recipe.
Baking really is a science and every recipe is created with specific ingredients, measurements and methods for a reason. If the recipe doesn’t include any suggested ingredient substitutions, I would shy away from testing any creative changes and follow the recipe like my life depended on it.
2. Use a Kitchen Scale.
The best pastry chefs and bakers will all tell you that the key to creating the best pastries every time is precision. The only way we can be achieve the level of precision needed in gluten free baking is to measure everything by weight using a kitchen scale. I know! It can feel intimidating to give up the measuring cups and switch to a kitchen scale. But I promise you it is much easier and less messy (yay to less dishes!). There are many great, relatively inexpensive options online starting from about $10.
*If you are in a pinch and absolutely need to use a measuring cup, be very intentional and use a spoon to add flour into a cup measurement. Fill the cup so its overflowing and then use the back of a butterknife to scrape off and level the flour.
3. Add More Liquid.
Many of the flours and starches used in gluten free baking absorb more liquid when compared to wheat flours. Because of this we need to add in extra moisture, often in the form of oil, butter, full-fat milk, yogurt and sour cream. This will ensure we have a nice moist crumb structure that won’t be too dry or fall apart.
4. Add More Baking Powder.
If you have every made anything gluten free you will know that the batters tend to be much gummier and heavier than traditional recipes. By adding in a little extra Baking Soda, we are giving our recipe a helping hand in pushing up against the heavy mixture and rising up to its full potential while baking.
5. Overmix the Batter.
Unless I’m baking pancakes or scones, I ALWAYS overmix my batter. In traditional baking you don’t want to overmix your batter because the gluten strands begin to breakdown and rebuild, creating a tight texture which leaves cakes and cookies tough and dense. Thankfully we don’t have to worry about that! Gluten free mixtures can actually benefit from extra mixing as it helps to incorporate all the ingredients and allows the flour more opportunity to absorb all the liquid.
6. Rest Batters and Doughs.
Gluten free batters and doughs need more time to absorb liquid. By letting your batters and doughs rest for 30 minutes after mixing, the recipe will have a better rise in the oven and the texture will be much softer.
7. Bake Lower and Longer.
Because gluten free recipes tend to have extra liquid, we need to allow more time for that additional moisture to evaporate during the baking process.
8. Let it Cool Down.
I’m the first person to admit that I often can’t wait to dig into a warm batch of brownies as soon as they are out of the oven. But trust me, most gluten free recipes need time to settle and cool before we cut into them. By allowing our recipes to rest and cool, we are allowing the hot air and steam to slowly rise up and out of our recipe. If we don’t wait for this to happen, that steam gets trapped and turns into moisture. We are then left with a very wet and stodgy texture.
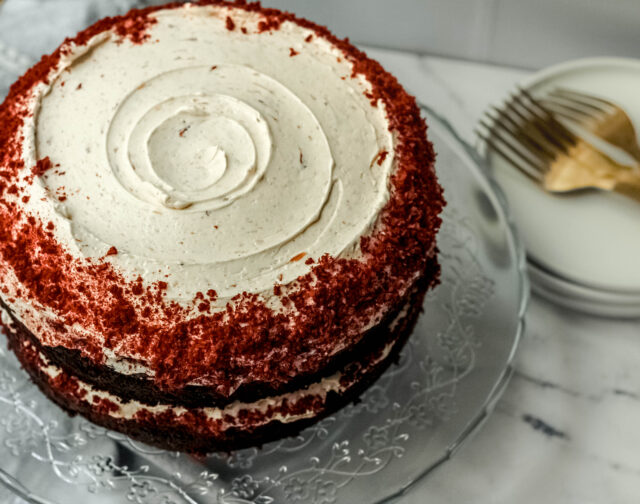
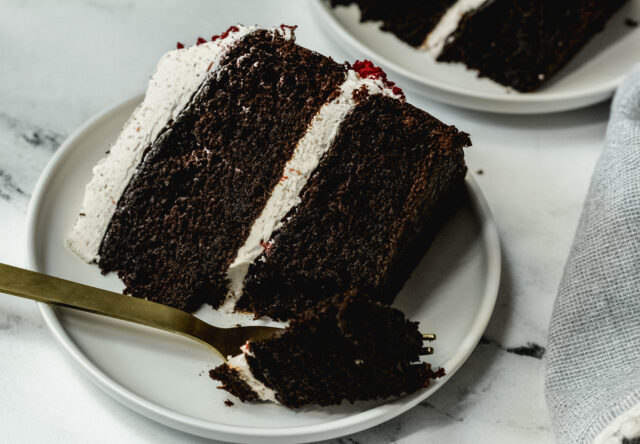
Practice some of these gluten free baking secrets and make my Gluten Free Strawberry Chocolate Cake!
- 290 g Gluten Free Flour Blend (with Xanthan Gum) *I used Bob's 1 to 1
- 80 g Cocoa Powder
- 1½ tsp Baking Powder
- 1⅓ tsp Baking Soda
- 1 tsp Kosher Salt
- 3 Large US Whole Eggs
- 1 Large US Egg Yolk Only
- ¾ c Buttermilk
- 160 ml Vegetable Oil *I prefer the mild taste of Canola Oil
- 1 c Brewed Coffee (cold)
- 220 g Granulated Sugar
- 150 g Light Brown Sugar
- 4 Large US Egg Whites Only
- 200 g Granulated Sugar
- Pinch Kosher Salt
- 450 g Unsalted Butter (room temperature)
- 4 tbsp Seedless Strawberry Jam
- 1 tbsp Vanilla Extract
- 2 tsp Lemon Juice
- Optional Extras
- 1 c Fresh Strawberries (sliced extra thin)
- ¼ c Freeze-dried Strawberries (crushed) *Optional
- Preheat the oven to 175°C/350°F degrees.
- Line the bottoms of two 8" round pans with parchment and grease with butter or baking spray. Set aside.
- In a medium bowl, whisk together gluten-free flour, cocoa powder, baking powder, baking soda and salt. Set aside.
- Using a stand mixer fitted with a whisk attachment, whip the sugars, eggs, oil, buttermilk, and coffee until fully incorporated. Add the dry mixture and mix until there are no streaks of flour and the batter is smooth. The batter will be quite thick and almost gummy.
- Pour the batter into prepared pans and smooth the top with an offset spatula or the back of a spoon. Firmly tap pan on a work surface to level the batter.
- Bake for 25 to 30 minutes, until a toothpick comes out clean. Allow the cake to cool in the pans. Once cooled the cake will keep in the fridge for 2-3 days wrapped in cling film or stored in an airtight container.
- In a bain-marie set over low heat, warm the egg whites, sugar and salt, whisking continuously until they are warm to the touch or approx 71°C. You can test this by dipping your finger in the mixture and rubbing it against your thumb. It should feel smooth and you shouldn't feel any sugar granules.
- Using an electric mixer fitted with the whisk attachment, whip the egg white and sugar mixture on medum-high speed until firm peaks form and it has cooled completely. This will take approx. 10 min.
- Switching to the paddle attachment, begin beating in butter 2-3 tablespoons at a time. Once fully incorporated, add strawberry jam, vanilla and lemon juice. Beat on medium-low until combined and smooth.
- Buttercream will keep in the fridge for up to 3 days. If refrigerated, allow the buttercream to come to room temperature and re-beat until smooth.
- Spread the top of each cake with the Strawberry Swiss Buttercream and sliced strawberries (if you have them) and layer the cake. Smooth the top of the cake with an offset spatula and sprinkle the edges with freeze-dried strawberries.
- Spread bottom cake with a thick layer of the Strawberry Swiss Buttercream and, if using, sliced strawberries. Place the other cake round on top and spread another thick layer of buttercream and smooth with an offset spatula. Sprinkle freeze-dried strawberries around the edges of the cake.
8 Gluten Free Baking Secrets article is written by Kira McMullan. Kira shares delicious gluten free recipes on her website: Kira in the Kitchen. Follow Kira on Instagram.
More Reading
- Beginners Guide to Gluten Free Baking
- Vegan and Gluten Free Pies and Tarts
- The Cost of Going Gluten Free
You can unsubscribe any time!


Leave a Reply